Time Blocking with Calendars: The Beginner’s Guide
Time Blocking with Calendars: The Beginner’s Guide
Do you ever reach the end of the day feeling exhausted, yet it seems like you’ve accomplished nothing of real importance? You were busy—replying to emails, attending meetings, and putting out fires—but your most significant projects remain untouched. This feeling of being “busy but not productive” is a common struggle in our hyper-connected world. The solution isn’t to work more hours; it’s to work smarter. This is where time blocking comes in, a simple yet transformative productivity method that can help you reclaim control of your day.
If you’re tired of reactive days hijacking your focus, this beginner’s guide will walk you through everything you need to know to start time blocking with your digital calendar. Prepare to turn your calendar from a simple record of appointments into your most powerful tool for intentional living and focused work.
What Exactly Is Time Blocking?
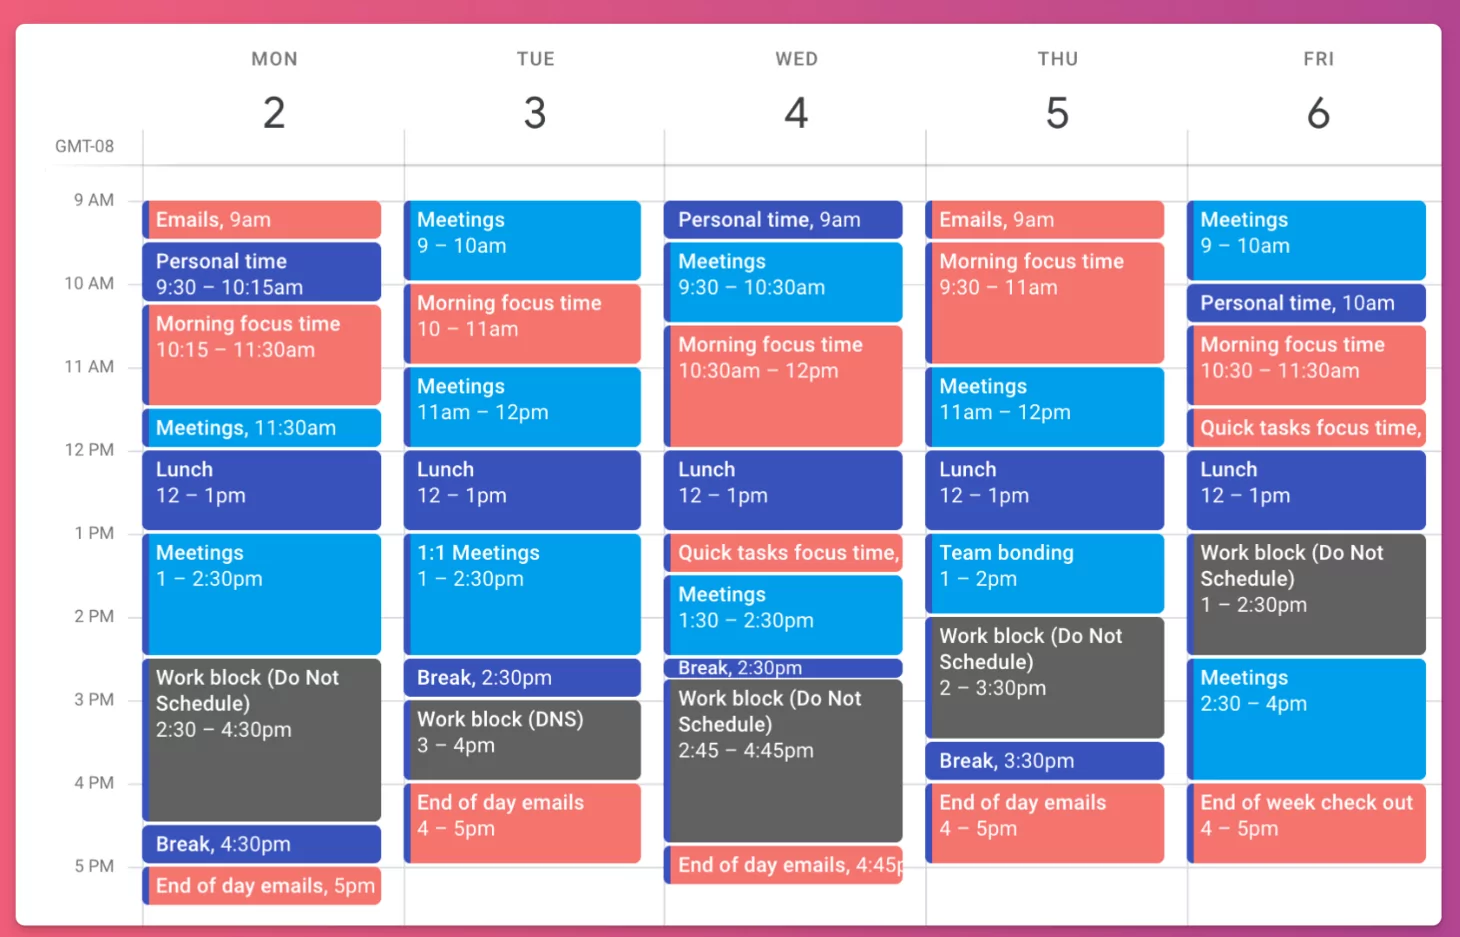
At its core, time blocking is the practice of proactively scheduling every part of your day. Instead of working off a long, daunting to-do list, you assign specific “blocks” of time in your calendar for each task or activity. This means that from the moment you start your workday until you finish, every minute has a job. A task like “Write report” is no longer a floating item on a list; it becomes a concrete appointment on your calendar, for example, “9:00 AM – 11:00 AM: Write Q3 Report.”
This method shifts your mindset from reactive to proactive. Rather than letting your inbox dictate your priorities, you decide in advance what matters most and dedicate protected time to it. It’s the difference between letting your day happen *to* you and designing the day you want.
Why is Time Blocking So Effective?
The popularity of time blocking among top performers like Elon Musk and Bill Gates isn’t a coincidence. The method is rooted in powerful psychological principles that enhance focus and productivity:
- It Eliminates Decision Fatigue: We make hundreds of small decisions every day. Deciding what to work on next is a constant drain on your mental energy. With a time-blocked schedule, that decision is already made. You simply look at your calendar and execute.
- It Encourages Deep Work: Constant context-switching—jumping between emails, messages, and tasks—is a productivity killer. By dedicating uninterrupted blocks of time to a single task, you create the ideal conditions for deep work, the state of intense focus where you can produce your best, most creative results.
- It Provides a Realistic View of Your Time: A to-do list is infinite, but your time is not. Time blocking forces you to confront the reality of the 24 hours you have. This helps you make better commitments and avoid overpromising, as you can visually see when you simply don’t have the bandwidth.
- It Combats Procrastination: Large, intimidating tasks are easier to put off. But breaking them down and scheduling a specific, manageable block of time to work on them (e.g., “Write introduction for blog post” for 30 minutes) makes it much easier to get started.
Getting Started: Your Step-by-Step Guide to Time Blocking
Ready to try it for yourself? All you need is a digital calendar (like Google Calendar, Outlook, or Apple Calendar) and a willingness to plan. Here’s how to create your first time-blocked schedule.
Step 1: The Brain Dump – Capture Everything
Before you can organize your time, you need to know what you’re organizing. Start by doing a “brain dump.” Create a master list of everything you need to do for the upcoming week. Don’t filter anything yet. Include:
- Work Tasks: Big projects, small administrative duties, preparing for meetings.
- Communication: Replying to emails, returning calls, checking Slack.
- Personal Appointments: Doctor’s visits, family commitments, social events.
- Personal Tasks: Errands, exercise, hobbies, meal prep.
- Rest & Downtime: Don’t forget to include breaks and relaxation!
Step 2: Prioritize Your List
With your master list in hand, it’s time to prioritize. Not all tasks are created equal. A simple way to do this is to identify your 1-3 most important tasks (MITs) for the week. These are the tasks that will have the most significant impact on your goals. For the rest, you can categorize them as either “high-impact” work that requires deep focus or “shallow work” like answering emails that can be done with less mental energy.
Step 3: Estimate How Long Each Task Will Take
This is often the hardest part for beginners. Be honest and realistic. If you think a task will take an hour, it’s safer to block out 75 or 90 minutes, especially when you’re just starting. It’s better to finish early than to have your entire schedule derailed by one underestimated task. Over time, you’ll become much more accurate at estimating.
Step 4: Start Blocking Your Calendar
Now for the fun part! Open your digital calendar and start creating events for your tasks. Here’s a recommended order:
- Block Non-Negotiables First: Put in your appointments, scheduled meetings, and personal commitments that are already at fixed times. Also, block out your lunch break.
- Schedule Your High-Impact Tasks: Allocate time for your most important tasks during your peak energy hours. For most people, this is in the morning. Protect this time fiercely. This is your “deep work” block.
- Practice Task Batching: Instead of checking email every 15 minutes, group similar shallow tasks together. Create a 30-minute block in the morning and another in the afternoon for all your emails and messages. This is task batching, and it’s incredibly efficient.
- Block Time for Shallow Work: Fill in the remaining gaps with your lower-priority administrative tasks.
- Schedule Buffer Time: This is crucial. Don’t create a back-to-back schedule. Add 15-minute “buffer” blocks between your main tasks. This gives you time to stretch, grab water, or handle small, unexpected interruptions without derailing your day.
Step 5: Color-Code for Clarity
Most digital calendars allow you to assign colors to events. Use this feature to your advantage. Assign a specific color to each category of activity. For example:
- Blue: Deep Work / High-Impact Tasks
- Green: Meetings & Calls
- Yellow: Shallow Work / Admin
- Red: Personal Time & Breaks
This gives you an instant visual overview of your day, helping you see if you have a good balance between focused work, collaboration, and rest.
Common Pitfalls and How to Overcome Them
Time blocking is a skill that improves with practice. Here are a few common challenges beginners face:
- The Perfect Schedule Illusion: Your first few schedules will be wrong, and that’s okay. You’ll underestimate times and get interrupted. The goal isn’t to follow the plan perfectly but to have a plan to return to. Review your day and adjust for tomorrow.
- Dealing with Interruptions: Unexpected things will always come up. If it’s urgent, handle it. If not, write it down on a “capture list” to be scheduled later. Your buffer time can absorb some of these interruptions.
- Being Too Rigid: Your calendar is a tool, not a prison. If you’re in a state of flow on a high-impact task, it’s okay to “borrow” time from your next block (if it’s less important). Flexibility is key.
Your First Step to a More Productive Life
Time blocking isn’t about rigid control; it’s about creating freedom. It’s the freedom from distraction, the freedom from decision fatigue, and the freedom to dedicate your best energy to the things that truly matter. Start small. Try time blocking just your next workday. Plan it out the night before, and when you wake up, simply execute your plan. You might be amazed at how much you can accomplish when you tell your time where to go, instead of wondering where it went.